Tuesday, March 26, 2013

Chalk Paint & Brass ..... A Love Story

It feels very gratifying to finally address the pile in the corner, of items I 
purchased last year that were earmarked for chalk paint.

I've started with the easiest designs, first the framed prints,
and now the brass repousse planter.

The raised relief of oak leaves, acorns, and claw feet
was screaming to be accentuated. 


Great detail, dontcha think?

It seems I always gravitate to Aqua,
but with brass, it does seem appropriate
since verdigris is aqua. And how convenient
that chalk paint and verdigris both 
have a matte appearance, creating a
beautiful contrast with the shiny brass.

Aqua, Oh Aqua, How I love Thee......


The solder on the base gave it a water-tight seal,
so I could feel confident about painting underneath.


I used my go-to Teal as my base coat,
then topped it with a light Aqua.
Of course the magic wouldn't be complete
without the customary clear and dark wax.

I don't know if I've mentioned it before,
but while the chalk paint does bond pretty well to metal, 
it's important to note that care is required when waxing it.
Since I'm not willing to wait weeks for the paint to cure,
 adding and polishing the wax can easily remove the paint
where you most want it to stay. So in this case,
distressing is a more delicate process.

Well, I better go. My next morph is a hanging wall cabinet and will require 
a lot of my design time. Many many color possibilities for this one.
Details soon........

Saturday, March 23, 2013

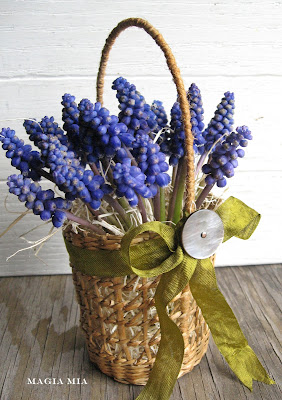
Morphing Into A Spring Basket


I think it's safe to say that my absolute favorite way to create is by transforming found objects and vintage components into new treasures.


I'm sure we've all seen these woven wicker glass holders before. I bought a stack of these at a garage sale a few years ago, and all this time they've been patiently waiting for me to find a good use for them. 

After failing to find glasses to fit inside, I finally figured out an attractive and functional design. 


How cute are these?

Antique Crocheted Doily, Silk Ribbon, Rhinestone Button
Grape Hyacinths in Votive Cup

Red Ticking Fabric, Raffia Bow, Skinny Breadsticks

Moss Seam Binding Ribbon, Abalone Button, Excelsior
Grape Hyacinths in Votive Cup

This is such a no-brainer project, I really don't know why it took me so long to have this epiphany. Since the basket body is already done, you only need to add the handle. I've never been interested in tedious basket-weaving, but I am certainly willing to sew in a handle. I say "sew" loosely, because all you're doing is threading jute twine around the wire and basket to hold them together. I chose jute because I wanted the handle to A) look rustic, and B) match the basket. 


All I used was jute twine, tie wire ( readily available at Lowe's, Home Depot, etc), and an upholstery needle with an eye that will hold jute. I had a large needle with a slightly curved point, which did make it a bit easier 
for maneuvering through the basket. 
I use tie wire because it's very malleable, yet sturdy. 
Some of these glass holders are squishier/softer than others, 
so adding the wire handle reinforces the basket, making it more functional. 
(P.S. You could use coat hanger wire, but it's much harder to bend curvy.)


I cut the tie wire in a length, that when bent into a handle, the handle area above the basket was about the same height as the basket body itself. I didn't want the handle to be any shorter, as there wouldn't be enough clearance for the contents. For my handle size, I cut a jute length of about 5 feet, to make sure I didn't run out of jute in the midst of sewing. I like the balanced look of this handle length, 
but you could certainly make the handle longer if you wanted to hang the baskets 
from a tree branch or door knob. 


I bent a small loop at the wire ends, so I could secure them to the basket better and keep the handle from slipping out when in use.

When I made the first basket, I attached the wire to the outside, which wasn't bad, but I ultimately chose to run it along the inside for a smoother exterior. If the inside proves too confining for your hands to thread, then just go for the outside. Just make sure to thread enough jute around the bottom to cover the wire loop. 


The advantage of sewing onto a basket, is that you can use the space between the wicker strips as your guide for the needle (just like cross stitch). 
Start threading the jute from the inside of the basket, through the wire loop, aligning the wire with a vertical wicker strip. Push the needle to the outside, thread around to the other side of the strip, then back inside through the closest space, winding it around the vertical wicker strip and the wire, over and over, 
all the way up the side of the basket. 
(Thread around the wire loop a couple times to secure it, 
before continuing up the side.)


Once you reach the top, just wind the jute around the wire handle, nice and tight so the jute doesn't slip when the handle is used. (That way, you don't need to use any glue to secure anything.) Once you reach the other end of the handle, just continue stitching right back into the basket, till you get to the bottom, threading through the wire loop a couple times to secure it, without needing to knot it. Then cut the jute inside, leaving about a 1/4" end to keep it from slipping to the outside, 
and you're done! (If you prefer to secure the end with hot glue, go for it.)


This last step was a personal preference. I wanted the basket to look warmer and aged, so I brushed on Caramel alcohol ink, using a soft, thick artist brush. I inked the basket and the handle, for a uniform look, making the finished basket look like it's always been that way, with no proof of a recently-added handle.

I just showed you a few examples, but you could certainly fill these with all sorts of things. For Spring or Summer, add a little starter plant and burlap ribbon as a gift to a gardener. Couldn't you picture these in a little cafe, holding skinny breadsticks, long pretzels, small condiment bottles, tea bags, sweetener packets, etc.? Add some Easter grass and candy, or pens/pencils, and crayons. Too many options to mention!

Yes, you're right. I could just go to the craft store and buy mini baskets. But then that would defeat the purpose of transforming a treasure from something you already have, now wouldn't it.....So have fun!


Linking To:
shabby creek cottage

Funky_Junk's_Party_Junk_link_party

Wednesday, March 20, 2013

Spring has Sprung & Painting has Begun!

It's beginning to look a lot like.......Springtime, 
cuz I'm gettin' that old feeling again. 
That feeling involving chalk paint makeovers. 

I've got a few items waiting in the queue, 
but I thought I'd start with some frames.
When I found this picture pair, 
I thought they'd be great candidates for paint, 
because I like the Old World images, and the frames had good bones.


But look at them now, Baby......


Before:


After:


Before:


After:


I fell in love with this color combination 
when I painted the frame for this Raoul Dufy print.


Depending on your monitor,
from a distance it's easy to think
the frames look sort of like emerald green,
buts that's because of the beautiful magic of layered colors.
Base coat is a Spring green,
then dark Moss green,
and finally that awesome dark Turquoise.
I also warmed up the gold with a new layer 
The other magical step is of course
the clear and dark wax, but mostly the dark wax.
After all the distressing, it just doesn't have an
authentically-aged look until you add that beautiful dark wax.

All I have left to do is paper the back, and they'll be ready for Etsy.

Next up:
 I'll be painting another brass repousse planter,
again with the chalk paint treatment. 
Ciao for now!


LINKING TO:

Jennifer Rizzo's
Fabulously Creative Friday

Friday, March 15, 2013

Silver Leaf, a Glue Gun, and Plastic Eggs

As I said before, I don't normally craft for Easter. 

While I think this may be  my final egg-centric creation for this Easter/Spring season, 
I reserve the right to change my mind.

It all started with a glass cloche, green moss, and a pewter base.
I wanted an elegant silver objet d'art to display inside.


I really had fun with this. 
What you're looking at is a plastic egg that I "drew" a design on 
with hot glue straight from the glue gun. After the glue had cooled and hardened,
(which only takes a minute or two), I brushed on leaf adhesive size.


Once dry, I applied a sheet of silver metal leaf., then brushed on brown 
and black alcohol ink, smooshing it into the crevices of the glue. 
For a final touch, I gently wiped some of the ink off the top of the glue lines and 
smooth surfaces of the egg, using a paper towel dipped in rubbing alcohol. 
What is left is a warm patina on the egg surface and darker ink in the crevices 
to enhance the contours, mimicking tarnish. Pretty cool, right?

I could have stopped there, but I realized that some people
are glue-gun-challenged. (Yeah Amy, I'm talkin' about you.)
So I thought I'd experiment with other methods,
and gave puff paint a try. Well, let me just say, that
while it basically worked, it was by no means
a picnic, nor as effective as the hot glue.

Here is a picture of the egg with a quick design drawn using puff paint.
Three reasons why I prefer the hot glue....
A) You have to wait at least an hour for the paint to dry. 
(Hot glue is cool and hardened almost immediately.)
B) Holding the egg while drawing with the puff paint 
makes it easy to smear the design you've just drawn..... 
C) The puff paint settles where it meets the egg, taking away the
distinct crevices needed for the ink to be smooshed into, and the profile is 
also a bit lower than the hot glue. What results is much of
the ink wiped away from the lines, taking away
the dramatic tarnished effect.


Here is a side by side of hot glue vs puff paint.
Although it may not look like much,
the puff paint egg on the right
has a very soft profile, compared
to the hot glue lines on the left egg.

Now if all this sounds like a hassle for an egg design,
you could just try some 3D stickers and go from there.
Or you could attach some flexible appliques made with
silicone and mini molds. There are lots of possibilities. 
I personally liked the instant gratification of hot glue, 
and the freedom to create my own designs.

With the egg at the top of the post, I drew a quick leaf
and vine design with a pen, then followed the 
lines with the glue gun. I should note that I used a mini
glue gun with a fine tip. That was actually the second egg 
I made with the hot glue. Here is the first one.....


Since I was experimenting, I didn't want to invest a lot
of time on a design, in case the technique failed to please.
So I just did some free-form swirls and lines with
the glue gun, just to get a feel for it.


The nice surprise here is that even something
as unexciting as sloppy swirls still seems
redeemable with the right treatment.
So even those who feel artistically-challenged
can create an elegant egg using simple lines.

I know I said I was probably done with egg crafts for now,
but I may feel compelled to draw a more perfect design,
so don't be surprised if you see another one here next week.
I do like the idea that the concept can be used
on other objects, like plain candlesticks, boxes,
frames, etc. That might get me thinking about 
Christmas ornaments.....Oy, too soon.

Come Join Me on Instagram!
@MagiaMiaEtsy


LINKING TO:

Funky_Junk's_Party_Junk_link_party

Spring Thing Linky Party Button

Thursday, March 14, 2013

A Coffee-Lovin' Literary Bird ......

With every thing I've crafted using vintage dictionary pages, from the Steampunk tree, to the Christmas stars, and the Candy Canes, I guess there's just no point in stopping there. Seems that any surface that's glue-able should have equal opportunity for the ephemera treatment.


I realize that book page eggs is very much a Been-There-Done-That concept, but that didn't stop me. It wouldn't be such a ubiquitous crafting project if it wasn't so easy, fun, and aesthetically-pleasing. About the only way to vary the design is the direction of the word strips, and how you display the eggs. 

So I chose to glue the sentences lengthwise, and I displayed the eggs in an old rusty coffee can with excelsior. Charming, right?


I made these using plastic eggs, and used wood glue because I like that it doesn't dry clear, giving the old paper more patina. I also prefer using these very old, browned pages because A) they are already a divine old color, and B) they tear into strips easily, making the edges soft & rustic, rather than cutting crisp edges with scissors. And what's more rustic than farm-fresh eggs?


Tomorrow I will post my most interesting (and most fun) egg project.

Until then....

Monday, March 4, 2013

More Mid Century plus Asian Treasures

I pirated quite a few treasures this weekend, but only 2 were ready for selling.
The rest will be getting the makeover treatment, most likely with chalk paint.

First up is another Mid Century find.......
Are these striking, or what? 
They have sort of a 30's/40's feel to them
(at least I think so),
but I'm calling them Mid Century.
They appear to be watercolors on dark paper. 
I found another set online that were labeled as watercolors
by the original picture company, which is Franklin.

When I first picked these up, I considered painting the frames, 
since I was seriously digging the stepped grooves. 
But in the end, I felt the frames were a wonderful contrast 
to the pictures, and any altering would only be gilding the lily.
I can totally picture these in a cozy
dark powder room wall, especially red.

The second treasure is something I'm not normally drawn to,
but they had such great details, that I couldn't resist them.

Since I hear that brass is back in fashion, as long as it's got patina
and not a shiny 80's flashback, I figured these would be more
than welcome in someone's library. 
I also thought they'd be great if they were back-lit, 
since the pierced design would make a dramatic silhouette.

I also found a fabulous footed brass planter, which will definitely
be chalk-painted. I'll make sure to take the requisite Before picture,
but it will be getting in line with several other
items waiting for my paint magic. 

I'm not usually inspired to paint, distress, and wax till Spring,
so I guess I'll be surrounded with items staring at me for awhile......

Linking To:


Related Posts Plugin for WordPress, Blogger...