Saturday, December 22, 2012

The Bygone Era of Christmas Postcards .......


It appears that the earth-shattering events of last week threw me off my game, with regards to Christmas projects. So now I find myself speed-crafting/photo-editing/blogging in the Eleventh hour........

First Post: I thought I'd share some of my collection, that has been one of my theme inspirations this year.

Antique Christmas Postcards........

Two artistic elements which are prevalent throughout my collection are 
bells and holly.

They are everywhere.

And add to these rich renderings, gorgeous embossing. 

Postcards are truly a lost art. Something not done anymore unless you're on vacation, and even then, only photographic types, 
with no gorgeous artwork anywhere....

The final sublime touch to an antique postcard is when it's been mailed, showing hand-writing, with pen and ink no less (!), the stamp, and the postmark from 1910.......Heaven.....


Since I will NEVER alter these, I make color copies shrunk down to fit into some of my petite picture frames. The originals are stuck into the tree, or hung from wherever I feel like it, using mini clothes pins or bent wire.

If I created nothing for Christmas, these beautiful nostalgic postcards would hold their own in the absence. 

Friday, December 21, 2012

Tiny Tart Tin Tree ........

As expected, I've been Christmas crafting all week, because I love it, 
and because I can.....

I know little tart tins have been transformed into ornaments in every configuration possible, but I decided to keep it simple......this time. :)

I've collected stacks and stacks of all sizes of these pretty little tins, some beautifully worn, and others bright and shiny. I've been wanting to create with them for years, but I kept getting distracted. This time, I did something about it.


I recently picked up a small tinsel tree at GW, knowing very well that I had a plethora of ornaments to come up with a themed tabletop tree. 
So what did I decide on?.........


A kitchen tree, and more specifically, a baking tree.....

Loads of little tart tins, each with their own sparkly charm.


Some have vintage rhinestone buttons, and others have little pinecones with silver German glass glitter. I attached the buttons with a glue gun, and the pinecones with removable putty, specifically cord weatherstrip,
available at the hardware store.


I really wanted to keep an all-silver color scheme with the ornaments, so I added a garland that is actually large ball chain, which I believe is, appropriately, the same size used for pie weight chain. I'm sure I could've easily used a beaded garland, but this chain has an incredible weight to it making it drape so beautifully. And with a nickle finish, it brilliantly shines like a mirror.

The tree sits in a star-shaped antique baking tin, which I lined with Spanish moss, then laid fresh green moss over it, to balance out the green of the tree, and also to add contrast to the tin.

I played around with different ways to hang the ornaments, because I didn't want anything that would permanently alter them, so I could use them again for future design ideas.


The empty tart tins are hanging from smaller ball chain, and the only things connecting them to the chain are Rare Earth magnets. (This is not an appropriate method if small children or pets try to play with the tree.) I wanted a clean and simple look to the hanging hardware, so this worked perfectly. Depending on the strength of these magnets, you may need to use a couple as I did, 
since they are so thin.


The tins with buttons or pinecones are facing out, to show off their sparkle, so I used a glue gun to attach silver pipe cleaners to their backs. Using a pipe cleaner keeps the tart in a facing-out position, so it doesn't dangle or turn. Using a glue gun allows for easy removal from the tins, or you can glue the pipe cleaner to a magnet, allowing you to re-use it to hang a different ornament.


The treetop's tin is a diamond-shaped one with small round tin inserted with a magnet between them, and a button glued inside the round tin. I used a metal lanyard clip with a magnet to fasten the diamond tin to the tree top.


This tree has a trunk wrapped with brown florist tape, and shows all the bumps created from attaching the branches, so I covered it with Spanish moss. I wanted something neutral, but not green, and wanted the silver on the tree 
to be the focal point.

I love so many styles that you just can't box me into one. Designing a variety of small, tabletop trees is the perfect answer to fulfill all of my decorating tastes, and for minimal cost, since you don't have nearly as much space to fill on a tiny tree. Since I had most of the components already, save for the tree and ballchain, this was quick and very inexpensive. Now that's my kind of decorating.......:)

Join me on Instagram
@MagiaMiaEtsy


Linking To:
Saturday Nite Special, a link party via Funky Junk Interiors

Wednesday, December 12, 2012

Nostalgic Dictionary Page Candy Canes

Somebody stop me..........

After all the things I've adorned with my old dictionary pages, I keep finding new things to create with them. There's just an old-fashioned charm about the look of ephemera-covered objects that I really love. Using vintage elements to create tree ornaments is at the top of my creativity list. I certainly don't have the vintage inventory that Laurie of Magpie Ethel has, but that doesn't stop me.

So, without further ado, here are my two latest creations.......


I really like the shape of old-fashioned candy canes.
They are more rounded at the top, unlike current
ones that have more of a U-shape.

Many many moons ago, when I was wishing
I had a metal-working shop to create my own
iron scroll pieces, I crafted a poor man's 
version, using tie wire and poly tubing, 
available at any home improvement store..
Tie wire is thick and strong, but very malleable. 
After cutting the desired length of tubing,
I inserted wire the same length, then formed 
them into the desired shape.

So it seemed like an easy undertaking to create
my own candy cane shape using the same method.


After cutting many many many 1/4" strips of dictionary pages,
I wound one strip at a time with glue, overlapping the edges.
I wrapped a second layer over the first, to make the
shapes more sturdy and stationary, since the aged paper
becomes quite brittle with glue and can easily crack if bent.
A few coats of glue later, to protect and harden,
they were ready to embellish.

I went with shabby elegance on this style.
Crocheted lace, tea-stained cheesecloth, creme & silver
cording, and a tiny pine cone with silver German glass glitter.

In true Old-fashioned Christmas form,
I couldn't resist using lacquered holly.
My inspiration came from my collection of
antique Christmas postcards, with almost
all of them featuring holly and bells.
A little piece of red ticking, a small silver bell,
and tied off with the most wonderful baker's twine
in kraft & black. Just for fun, I cut a number
in a circle shape, from leftover scraps of 
Bingo cards I used for my previous star ornaments.
I love the numeral style, and I just couldn't throw the
scraps away, hoping someday I could use them for 
something. So glad I saved them now.
  
I'm really happy with the results, and now
I think I need to make some more!
I will inevitably still be creating things for at least
another week, since Christmas isn't Christmas
unless I'm crafting things......:)

Join me on Instagram


Linking To:
Saturday Nite Special, a link party via Funky Junk Interiors

shabby creek cottage

Sunday, December 9, 2012

Atlas Christmas Tree

It just wouldn't be Christmas 
if I didn't create at least one new tabletop tree design.

As a follow-up to my Steampunk tree from last year, 

and inspired by the jewelry chest from this year.......

My new quirky tree......

After creating the jewelry chest with map-lined drawers, 
and painting a compass rose-inspired star on top,
followed by decoupaged map tree ornaments,
you didn't really think I'd stop there, did you?

The only thing left to do was a tree.
I used a paper-mache cone form,
then cut out foam core in a star shape,
and connected the two with a small wooden spindle.

The base star and the top star are both encrusted with
a mix of gold and dark orange German glass glitter.
The base star acts as a tree skirt,
with a compass rose theme.


I added vintage amber rhinestones an an homage to map pins, 
and a sparkly accent to the aqua ocean, 
as well as the top star's center.


The aqua and bronze is enough to keep me happy, 
but combining it with Christmas decor
makes me all warm and fuzzy........

Join me on Instagram
@MagiaMiaEtsy


Linking To:
Saturday Nite Special, a link party via Funky Junk Interiors

Saturday, December 1, 2012

Twinkle Twinkle, Ephemera Star

This time of year, I can't seem to stop myself 
from creating new ornament designs. 
They flow through my brain much faster than my hands can create them. 

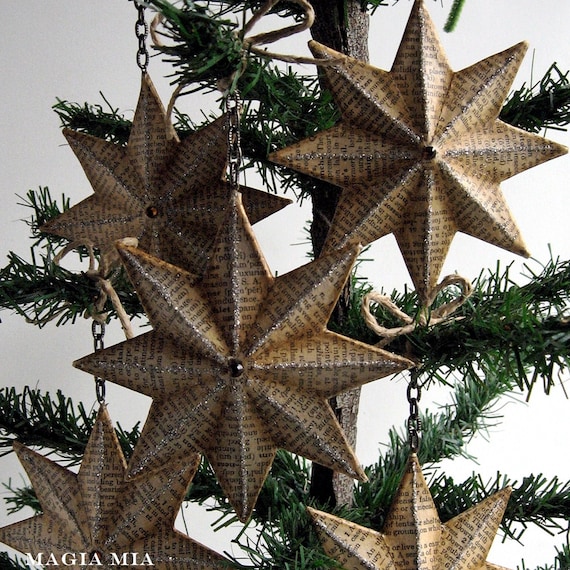
Last year while thrifting in December, I found a bag of paper-mache star ornaments, which had gold leaf and cheap gold cording for hanging. The instant I looked at them, I thought these would be great for decoupaging ephemera on. Well, December moved too quickly, and I never got around to it. Fortunately, while recently foraging through my Christmas boxes, I rediscovered them early enough to follow through with my plan. 


Inspired by this Steampunk tree I created a couple of years ago, 
here is my newest design......... 


I cut out individual pieces of dictionary paper the shape of each star point.
I felt it would be more visually interesting, as opposed to just using
one whole piece over the entire star. I cut these pieces for 1 side,
with extra width to fold over the sides of each point. I did that
so there wouldn't be any gold showing on the edges.


Then on the other side, I glued these diamond-shaped pieces,
covering up the edges I folded over from the other side.
Once the gluing was done, I coated both sides with wood glue.
Once that was dry, I sealed it with matte varnish, which would then dry
with subtle crackling, due to the wood glue beneath.
I then darkened all the edges and crevices with alcohol ink,
using both Adirondack and a Prismacolor pen. 
Inking up something with more than one color looks more aged,
since patina is often uneven on an old piece.


After I pulled out the gold cording, I replaced it with an eye pin 
(used in jewelry-making), 
securing it with super glue. I then attached beautiful 
textured gunmetal chain to the eye pin,
and tied the last link with jute twine for hanging on the tree.
The final touches to really make it twinkle, are silver glass glitter,
glued to all the peaks of each star point, and a smoky Topaz rhinestone
to the center. All these details were done on both sides,
so the ornament would look attractive all around,
whether hanging from a garland overhead, 
or hanging from a Noble tree branch,
where there's a lot of space in between.


Once the glass glitter tarnishes, it will coordinate beautifully 
with the gunmetal chain.


Despite the time-consuming nature of cutting and gluing so many little
pieces of paper, they were actually really enjoyable to create. 
I only wish I had more of these stars. I made a dozen, 
but I'm having trouble locating more of this star shape. 
All the paper-mache stars I've found are only
5 or 6 points, but I'm quite partial to 8-pointed stars.
Anyone know where I can find some?

Join me on Instagram
@MagiaMiaEtsy


Linking To:
Related Posts Plugin for WordPress, Blogger...