Saturday, December 1, 2012

Twinkle Twinkle, Ephemera Star

This time of year, I can't seem to stop myself 
from creating new ornament designs. 
They flow through my brain much faster than my hands can create them. 

Last year while thrifting in December, I found a bag of paper-mache star ornaments, which had gold leaf and cheap gold cording for hanging. The instant I looked at them, I thought these would be great for decoupaging ephemera on. Well, December moved too quickly, and I never got around to it. Fortunately, while recently foraging through my Christmas boxes, I rediscovered them early enough to follow through with my plan. 


Inspired by this Steampunk tree I created a couple of years ago, 
here is my newest design......... 


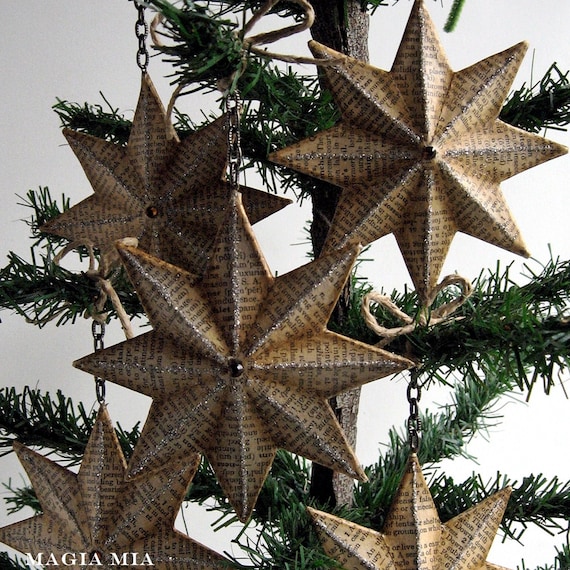
I cut out individual pieces of dictionary paper the shape of each star point.
I felt it would be more visually interesting, as opposed to just using
one whole piece over the entire star. I cut these pieces for 1 side,
with extra width to fold over the sides of each point. I did that
so there wouldn't be any gold showing on the edges.


Then on the other side, I glued these diamond-shaped pieces,
covering up the edges I folded over from the other side.
Once the gluing was done, I coated both sides with wood glue.
Once that was dry, I sealed it with matte varnish, which would then dry
with subtle crackling, due to the wood glue beneath.
I then darkened all the edges and crevices with alcohol ink,
using both Adirondack and a Prismacolor pen. 
Inking up something with more than one color looks more aged,
since patina is often uneven on an old piece.


After I pulled out the gold cording, I replaced it with an eye pin 
(used in jewelry-making), 
securing it with super glue. I then attached beautiful 
textured gunmetal chain to the eye pin,
and tied the last link with jute twine for hanging on the tree.
The final touches to really make it twinkle, are silver glass glitter,
glued to all the peaks of each star point, and a smoky Topaz rhinestone
to the center. All these details were done on both sides,
so the ornament would look attractive all around,
whether hanging from a garland overhead, 
or hanging from a Noble tree branch,
where there's a lot of space in between.


Once the glass glitter tarnishes, it will coordinate beautifully 
with the gunmetal chain.


Despite the time-consuming nature of cutting and gluing so many little
pieces of paper, they were actually really enjoyable to create. 
I only wish I had more of these stars. I made a dozen, 
but I'm having trouble locating more of this star shape. 
All the paper-mache stars I've found are only
5 or 6 points, but I'm quite partial to 8-pointed stars.
Anyone know where I can find some?

Join me on Instagram
@MagiaMiaEtsy


Linking To:

Tuesday, November 20, 2012

Maps, Turquoise, and Bronze.......Holiday Style

Oh, it's been so long since my last post. Well, it's that time of year, when I'm immersed in Christmas crafting and lose all track of time!

Every year, I open my mind to inspiration, to see what new designs I can come up with for ornaments and decorations. It's obvious I've got a one track mind this year, because the common thread running through my creations is maps, with emphasis on turquoise and bronze copper. I'm quite sure it's due to my most recent painting creation, this jewelry chest.

So, without further ado, here are my designs for this Christmas............


 You see what I mean? Can't seem to shake the obsession with maps, 
compass roses, and turquoise and bronze.

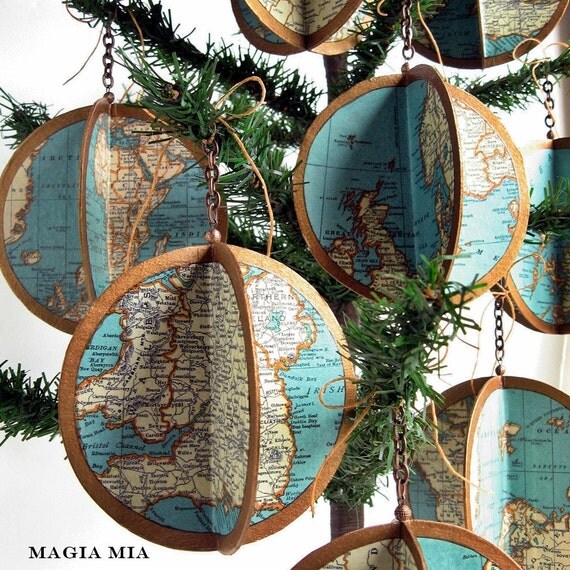
The globe ornament is decoupaged with copies 
from one of my antique atlases. 
All the maps in this book are printed with only cream, turquoise and orange. 
For each ornament, I cut 2 circles (by hand. Oy.) from thick chipboard, 
then folded them in half and joined the folds with glued paper strips.
After I added the map circles, I crackled the sealed surface to give it
the appearance of crazing of an old globe. I painted the chipboard edges
with metallic bronze as a subtle reference to the gold meridian on globes.
Topped off with a globe-inspired metal bead and textured chain.

The stars were also cut by hand from thick chipboard. I found this fabulous and brilliant turquoise German glass glitter. I painted a base coat of dark turquoise, alternating with a custom bronze-gold paint that I added gold pigment powder to to make it more brilliant. I also topped off these stars with the little globe-ish bead, and attached bronze-colored wire bent into a 
graceful hook for hanging.

Globe Map Atlas Ornament ...... Limited Edition Handmade Decoupage Turquoise Bronze


I can never get tired of playing with glitter, paper, paint and glue......can you?

Turquoise and Bronze, how do I love thee?...................

Linking To:

shabby creek cottage

Saturday, November 3, 2012

My latest Treasure Chest Masterpiece......

I’ve painted a lot of jewelry boxes, frames, and shelves, but I do believe this is my new favorite!

I was a little concerned this project might not make me happy, when I vacillated endlessly over the color choices. As a rule, I feel my best ideas just fall into place pretty quickly, so when it doesn’t, it feels forced and uninspired. What made matters worse is that I custom-mixed every single color, along with turning them all into chalk paint, and it seemed to take forever before I was satisfied with the tints. (Word to the wise…..if you want to tackle a project with several colors of chalk paint, save yourself the time to make them and just buy Annie Sloan’s chalk paint. The consistency is already perfect.)


Before......

Voila!


I created 5 colors for this piece. The base coat is brick red, then a sharp rusty orange, and a zesty mossy green. The final layer is a fabulous deep and vibrant tint that I would call a cross between turquoise, aqua, and teal. I think this is my new favorite color. Glad I made plenty of this for another project. I also mixed a chocolate brown into the black to make it rich and warm.


After all the distressing revealed the undercoats, the orange against the red morphs into a beautiful copper tone, and the green backing the turquoise morphs into a yummy verdigris. The combination of all the colors backing the warm black is just perfection. I topped off the chest with a compass rose-inspired star, using the orange and black paint. And as usual, finished with clear and dark wax.

But of course I couldn’t stop there. Since I lined the drawers in my last jewelry box project with map paper, I liked it so much that I had to do it again. This time I made copies of old maps from an antique map in my Atlas collection. I love that all the maps in this book are printed using only ivory, aqua blue, orange, and black, coordinating perfectly with the paint colors.


I am so in love with this color combination, that I may have to repeat myself on the next project.
Couldn't resist grouping this with my black pumpkins. Awesome contrast! I have an old hanging spice/apothecary cabinet that is itching to be painted…….sooo gotta go. Projects are waitin!

Follow me on Instagram


Linking To:
Saturday Nite Special link party via Funky Junk Interiors

Tuesday, October 16, 2012

Rainy Day Treasures


Here’s a few of my latest thrifting treasures.


Mid Century petite metal candle holders, in the most perfect greenish Aqua. Made in Sweden.


Fabulous wicker/rattan suitcase. I was really attracted to the weave. It’s a more delicate ribbed texture than the typical wicker. It still has a faded older Macy’s price tag on the inside.


Always a fun find. An unopened package of Antioch bookplates. I’m quite certain the 3 little owls will be a hit on Etsy.


Very Retro set of 4 coffee cups in harvest gold and brown. Each with a different design. Very charming.


Here’s something I don’t see often in my thrifting. Not 1 but 2  Old World instruments. A Russian lacquer-painted zither or lap harp. Gorgeous colors which will fit right into Christmas décor.

And a kalimba or thumb piano. Great little World music instrument for the well-traveled home.

LINKING TO:

Wednesday, October 10, 2012

Decoupaging The Game

Even after a lifetime of learning new artistic techniques, it's still suprisingly enjoyable to go back to basic childhood fun, with scissors, paper and glue,

I usually paint a Halloween-themed bowl this time of year to be used for handing out Trick-or-Treat candy. I didn't think I'd have time for that, but then I missed not crafting one. I found this bowl at the thrift store, and with such a great shape, thought it might be great for decoupage. Not Halloween-themed. I just wanted to create a fun bowl. What is this thing I have for bowls? I don't really know. Maybe it's tied to my Aquarian identity as the Water Bearer. Or maybe I just have a thing for vessels in general.........

I'm sure you've seen these everywhere.......high-gloss accent bowl for holding textured what-nots on a coffee table. After sanding off the gloss finish, it was ready for adhesion.

So what do you think?

Although I said I didn't have time to paint a bowl, I ended up spending way more time than expected designing the bowl. Designing always takes much longer than execution. At least for me it does......


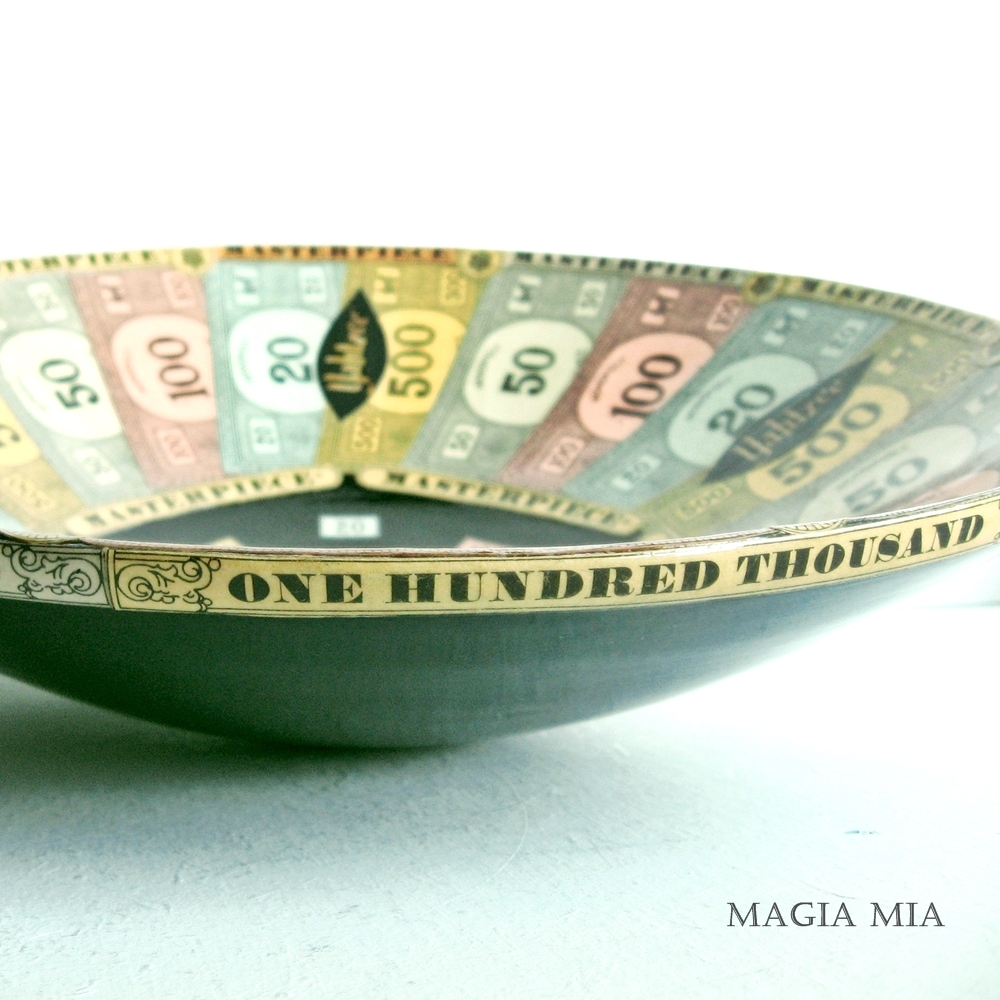
I had already pictured the side to the rim early on, so that part of the design came easy. Believe it or not, it was designing the center that took all my time. I put together so many different combinations for it, and every time I thought I had it right, a voice in my head said "just because you can, doesn't mean you should". Every configuration took away from the side design. So in the end, I kept the middle simple, opting for painting it black, with little tie-ins to the sides.

I've had this old Monopoly money for a few years now, but I still hadn't used it. It's very well-loved money from the 1935 issue, so there is great character in the paper, with wrinkles, tiny tears, and tape residue. I also like the fact that some of the denominations from the old version are a different color than they are now.

I added some very pretty Masterpiece clippings, and finally the Yahtzee logo. Love the punches of black.

I glued all pieces with wood glue for a strong bond, but I also knew that if I sealed everything with wood glue, I could create a crackle finish with my final clear coat. Wood glue is a super cheap crackle medium. I thought the crackled varnish could look like crazing, giving the bowl a more vintage look. I used a glossy outdoor varnish, which I tinted just a hint with Caramel alcohol ink, just to give it a bit of patina.

I kept the outside of the bowl a smooth and solid, glossy black, again to let the inside of the bowl be the showpiece. I only added one strip across the top outer edge, with alternating Masterpiece increments of One Hundred Thousand and Five Hundred Thousand. I love the contrast of the black exterior with the colorful interior.

I"m really digging how this turned out, and immediately pictured it holding the kitty for some friendly gambling. But then again, it could still be fun for handing out Halloween candy.

So much for a quick project....Oh-so typical for me......:)


Join me on Instagram


LINKING TO:

Saturday Nite Special link party via Funky Junk Interiors

Thursday, September 27, 2012

Vintage Globe Greatness

Just had to share my latest awesome find!

I was lucky to snag this Replogle Reference Globe just as it was being put on the shelf.


It has a full Meridian on a wood-grained base, but I was a bit perplexed about the other ring around it with beads that slide. I searched high and low, but couldn't find a single one on the web like it. I finally asked for assistance, via a fantastic site for all things maps and globes. Murray Hudson is a major collector and store, if you are ever looking for a vintage piece for your collection.They were kind enough to send me a link of my exact globe model, and they had one in stock for sale.

Imagine my surprise when I found out it is a scarce globe, because it is uncommon to find this model with the ring still attached. It is an Orbit Ring, and is attached with clips on the meridian. The ring pivots at the clips, and the clips are movable. The bead on each side is meant to be a satellite, and you can slide them along the ring to demonstrate the satellite's path.

Ah, the simpler times. When a kid had that innocent sense of wonder, and could have fun with a bead on a globe.......

This model was first published in 1958 or '59, after the Sputnik Satellite mission. Based on my geographical research, this globe is from 1961 or '62. I am happy to say this globe is still vibrant in color and condition..........for being my age. :)

Linking To:
Related Posts Plugin for WordPress, Blogger...