Showing posts with label Book Pages Decoupage. Show all posts

Sunday, March 1, 2015

Revisiting the Coffee-Loving Literary Bird

Since one of my egg pictures seems to be getting 
pinned a lot lately, 
I thought it was due for a re-post of my craft project, 
for those with Spring on the brain.....

With every thing I've crafted using vintage dictionary pages, from the Steampunk tree, to the Christmas stars, and the Candy Canes, I guess there's just no point in stopping there. Seems that any surface that's glue-able should have equal opportunity for the ephemera treatment.


I realize that book page eggs is very much a Been-There-Done-That concept, but that didn't stop me. It wouldn't be such a ubiquitous crafting project if it wasn't so easy, fun, and aesthetically-pleasing. About the only way to vary the design is the direction of the word strips, and how you display the eggs. 


So I chose to glue the sentences lengthwise, and I displayed the eggs in an old rusty coffee can with excelsior. Charming, right?


I made these using plastic eggs, and used wood glue because I like that it doesn't dry clear, giving the old paper more patina. I also prefer using these very old, browned pages because A) they are already a divine old color, and B) they tear into strips easily, making the edges soft & rustic, rather than cutting crisp edges with scissors. 


And what's more rustic than farm-fresh eggs?

Come Join me on Instagram!


Tuesday, June 17, 2014

A Nostalgic Train Case Makeover with a First Dibs Offer to my Readers

It seems that the majority of the makeovers I feature on my blog involve chalk paint. While that may be true, every once in a while I stumble on a piece that has a lot of character, and just a little accessorizing puts the charm factor over the top.

This train case is an example of that.
With a warm black, faux crocodile covering, a clear plastic handle, and rusty, darkened hardware, this piece already had a lot going for it in the way of vintage charm.


Although to some, the wear to the covering, fraying, dings, scuffs, and exposed wood might not seem attractive, I think it shows it’s potentially eventful history, and I like it that way.


Therefore, I only touched up a few dings here and there, keeping the vintage authenticity intact. I waxed all the covering, to seal it and give it richness and even sheen.


The real fun to this piece lies inside. There was a perfectly good mirror inside the lid, so no sense in removing it. The removable tray, that is usually in a train case, was gone, but I left the wood ledges that it rests on, so the next owner could put their own tray on
if they chose to.


Behold! Nostalgic Panache!
I have some small catalogs that are reproductions of 1909 Sears catalogs. These repros are vintage from 1979, so they have gorgeous browned/yellowed pages. I thought it would be fun to use the jewelry and shoe pages, and decoupage them to the inside. It seemed an appropriate choice for a train case.


I love love love how it turned out. I sealed the inside with several coats of gloss varnish, to extend the new life of this piece. I also painted the border paper of the mirror and the wooden ledges a gloss black to gel with the exterior.

Recently, it was suggested to me by one of my customers that some of my blog readers might be more interested in puchasing my creations more than attempting DIY. So I'm trying out that theory right now.

I am offering first dibs to my blog readers and Facebook followers to purchase this train case from my blog, before I list it on Etsy. I also want to find out what types of projects and makeovers attract the majority of my readers.


UPDATE: Offer has Ended, and now listed on Etsy.
Purchase price for my readers is $36 + shipping, via Paypal. Otherwise, I will list it in my Etsy shop for $48 plus shipping.

This piece measures 11-1/4” long, 7” high closed, and 6-1/2” front to back. It weighs 3 pounds before packaging, so I can ship it Priority or Standard Post. You can email me with your zip code, so I can quote you exact shipping before you purchase it. To purchase this piece, I will email you a Paypal invoice, which you can pay with
your Paypal account or credit card.

If this sells via the blog, I will visit the possibility of selling more of my creations here as well. I’ve also been wanting to offer newer items with vintage style and farmhouse chic, since this type of merchandise does not qualify to be sold on Etsy. Time will tell!

Linking To:


Thursday, March 14, 2013

A Coffee-Lovin' Literary Bird ......

With every thing I've crafted using vintage dictionary pages, from the Steampunk tree, to the Christmas stars, and the Candy Canes, I guess there's just no point in stopping there. Seems that any surface that's glue-able should have equal opportunity for the ephemera treatment.


I realize that book page eggs is very much a Been-There-Done-That concept, but that didn't stop me. It wouldn't be such a ubiquitous crafting project if it wasn't so easy, fun, and aesthetically-pleasing. About the only way to vary the design is the direction of the word strips, and how you display the eggs. 

So I chose to glue the sentences lengthwise, and I displayed the eggs in an old rusty coffee can with excelsior. Charming, right?


I made these using plastic eggs, and used wood glue because I like that it doesn't dry clear, giving the old paper more patina. I also prefer using these very old, browned pages because A) they are already a divine old color, and B) they tear into strips easily, making the edges soft & rustic, rather than cutting crisp edges with scissors. And what's more rustic than farm-fresh eggs?


Tomorrow I will post my most interesting (and most fun) egg project.

Until then....

Wednesday, December 12, 2012

Nostalgic Dictionary Page Candy Canes

Somebody stop me..........

After all the things I've adorned with my old dictionary pages, I keep finding new things to create with them. There's just an old-fashioned charm about the look of ephemera-covered objects that I really love. Using vintage elements to create tree ornaments is at the top of my creativity list. I certainly don't have the vintage inventory that Laurie of Magpie Ethel has, but that doesn't stop me.

So, without further ado, here are my two latest creations.......


I really like the shape of old-fashioned candy canes.
They are more rounded at the top, unlike current
ones that have more of a U-shape.

Many many moons ago, when I was wishing
I had a metal-working shop to create my own
iron scroll pieces, I crafted a poor man's 
version, using tie wire and poly tubing, 
available at any home improvement store..
Tie wire is thick and strong, but very malleable. 
After cutting the desired length of tubing,
I inserted wire the same length, then formed 
them into the desired shape.

So it seemed like an easy undertaking to create
my own candy cane shape using the same method.


After cutting many many many 1/4" strips of dictionary pages,
I wound one strip at a time with glue, overlapping the edges.
I wrapped a second layer over the first, to make the
shapes more sturdy and stationary, since the aged paper
becomes quite brittle with glue and can easily crack if bent.
A few coats of glue later, to protect and harden,
they were ready to embellish.

I went with shabby elegance on this style.
Crocheted lace, tea-stained cheesecloth, creme & silver
cording, and a tiny pine cone with silver German glass glitter.

In true Old-fashioned Christmas form,
I couldn't resist using lacquered holly.
My inspiration came from my collection of
antique Christmas postcards, with almost
all of them featuring holly and bells.
A little piece of red ticking, a small silver bell,
and tied off with the most wonderful baker's twine
in kraft & black. Just for fun, I cut a number
in a circle shape, from leftover scraps of 
Bingo cards I used for my previous star ornaments.
I love the numeral style, and I just couldn't throw the
scraps away, hoping someday I could use them for 
something. So glad I saved them now.
  
I'm really happy with the results, and now
I think I need to make some more!
I will inevitably still be creating things for at least
another week, since Christmas isn't Christmas
unless I'm crafting things......:)

Join me on Instagram


Linking To:
Saturday Nite Special, a link party via Funky Junk Interiors

shabby creek cottage

Sunday, December 9, 2012

Atlas Christmas Tree

It just wouldn't be Christmas 
if I didn't create at least one new tabletop tree design.

As a follow-up to my Steampunk tree from last year, 

and inspired by the jewelry chest from this year.......

My new quirky tree......

After creating the jewelry chest with map-lined drawers, 
and painting a compass rose-inspired star on top,
followed by decoupaged map tree ornaments,
you didn't really think I'd stop there, did you?

The only thing left to do was a tree.
I used a paper-mache cone form,
then cut out foam core in a star shape,
and connected the two with a small wooden spindle.

The base star and the top star are both encrusted with
a mix of gold and dark orange German glass glitter.
The base star acts as a tree skirt,
with a compass rose theme.


I added vintage amber rhinestones an an homage to map pins, 
and a sparkly accent to the aqua ocean, 
as well as the top star's center.


The aqua and bronze is enough to keep me happy, 
but combining it with Christmas decor
makes me all warm and fuzzy........

Join me on Instagram
@MagiaMiaEtsy


Linking To:
Saturday Nite Special, a link party via Funky Junk Interiors

Saturday, December 1, 2012

Twinkle Twinkle, Ephemera Star

This time of year, I can't seem to stop myself 
from creating new ornament designs. 
They flow through my brain much faster than my hands can create them. 

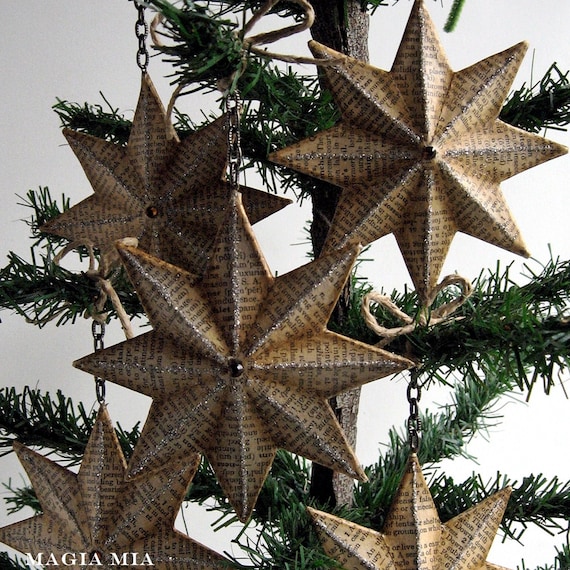
Last year while thrifting in December, I found a bag of paper-mache star ornaments, which had gold leaf and cheap gold cording for hanging. The instant I looked at them, I thought these would be great for decoupaging ephemera on. Well, December moved too quickly, and I never got around to it. Fortunately, while recently foraging through my Christmas boxes, I rediscovered them early enough to follow through with my plan. 


Inspired by this Steampunk tree I created a couple of years ago, 
here is my newest design......... 


I cut out individual pieces of dictionary paper the shape of each star point.
I felt it would be more visually interesting, as opposed to just using
one whole piece over the entire star. I cut these pieces for 1 side,
with extra width to fold over the sides of each point. I did that
so there wouldn't be any gold showing on the edges.


Then on the other side, I glued these diamond-shaped pieces,
covering up the edges I folded over from the other side.
Once the gluing was done, I coated both sides with wood glue.
Once that was dry, I sealed it with matte varnish, which would then dry
with subtle crackling, due to the wood glue beneath.
I then darkened all the edges and crevices with alcohol ink,
using both Adirondack and a Prismacolor pen. 
Inking up something with more than one color looks more aged,
since patina is often uneven on an old piece.


After I pulled out the gold cording, I replaced it with an eye pin 
(used in jewelry-making), 
securing it with super glue. I then attached beautiful 
textured gunmetal chain to the eye pin,
and tied the last link with jute twine for hanging on the tree.
The final touches to really make it twinkle, are silver glass glitter,
glued to all the peaks of each star point, and a smoky Topaz rhinestone
to the center. All these details were done on both sides,
so the ornament would look attractive all around,
whether hanging from a garland overhead, 
or hanging from a Noble tree branch,
where there's a lot of space in between.


Once the glass glitter tarnishes, it will coordinate beautifully 
with the gunmetal chain.


Despite the time-consuming nature of cutting and gluing so many little
pieces of paper, they were actually really enjoyable to create. 
I only wish I had more of these stars. I made a dozen, 
but I'm having trouble locating more of this star shape. 
All the paper-mache stars I've found are only
5 or 6 points, but I'm quite partial to 8-pointed stars.
Anyone know where I can find some?

Join me on Instagram
@MagiaMiaEtsy


Linking To:

Tuesday, November 20, 2012

Maps, Turquoise, and Bronze.......Holiday Style

Oh, it's been so long since my last post. Well, it's that time of year, when I'm immersed in Christmas crafting and lose all track of time!

Every year, I open my mind to inspiration, to see what new designs I can come up with for ornaments and decorations. It's obvious I've got a one track mind this year, because the common thread running through my creations is maps, with emphasis on turquoise and bronze copper. I'm quite sure it's due to my most recent painting creation, this jewelry chest.

So, without further ado, here are my designs for this Christmas............


 You see what I mean? Can't seem to shake the obsession with maps, 
compass roses, and turquoise and bronze.

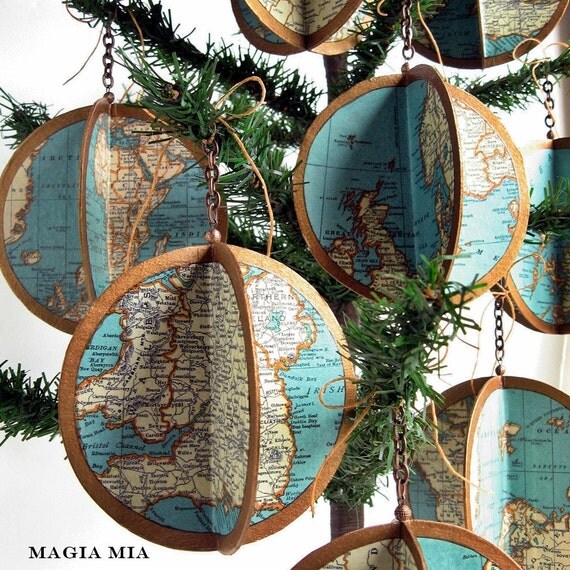
The globe ornament is decoupaged with copies 
from one of my antique atlases. 
All the maps in this book are printed with only cream, turquoise and orange. 
For each ornament, I cut 2 circles (by hand. Oy.) from thick chipboard, 
then folded them in half and joined the folds with glued paper strips.
After I added the map circles, I crackled the sealed surface to give it
the appearance of crazing of an old globe. I painted the chipboard edges
with metallic bronze as a subtle reference to the gold meridian on globes.
Topped off with a globe-inspired metal bead and textured chain.

The stars were also cut by hand from thick chipboard. I found this fabulous and brilliant turquoise German glass glitter. I painted a base coat of dark turquoise, alternating with a custom bronze-gold paint that I added gold pigment powder to to make it more brilliant. I also topped off these stars with the little globe-ish bead, and attached bronze-colored wire bent into a 
graceful hook for hanging.

Globe Map Atlas Ornament ...... Limited Edition Handmade Decoupage Turquoise Bronze


I can never get tired of playing with glitter, paper, paint and glue......can you?

Turquoise and Bronze, how do I love thee?...................

Linking To:

shabby creek cottage

Related Posts Plugin for WordPress, Blogger...