Pages

Tuesday, May 27, 2014

Kitty Bliss & Chalk-Painted Sconces

I can't believe how long it's been since my last post! I was kitty-sitting and painting furniture for a client friend.


But playing with this impish cutie pie, it's easy to see why I was distracted.
She is appropriately named Charlie for that adorable Chaplin mustache....:)

So now let's look at my latest chalk paint makeover.
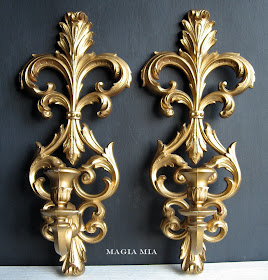
Look at what I found another pair of at Goodwill……

Last time, I painted them in 4 or 5 colors, in this post.


This time around, I was inspired to paint them in the same chalk paint colors as the dresser tilt mirror that I currently have listed in my Etsy shop. I thought they would make a lovely coordinated ensemble in the same room together.


Although I did use the same colors, along with clear and dark wax, overlapping them with each other definitely softens the Aqua.
No large areas of any one color will have that effect.


I covered each piece in the creamy Beige color, because I wasn’t fond of the original cold metallic gold. The creamy base gives a nice light background to brighten the topcoat, which, in this case, was the Aqua..


I then took the Beige color again, and using it sparingly, added fine highlights to the highest ridges. I added the most creamy beige to the petals on the candle cup, to show off their shape better.
Next, I added a custom-mixed metallic Bronze paint to all the curves I wanted to accentuate.


I also wanted to show you how I prep these pieces before I paint them. I always file down the mold seams first,  so they don't look like cheap plastic after I go to so much trouble painting them.


After finishing them off with the waxes, I touched up bits of Bronze here and there, keeping it imperfect and random.
So, believe it or not, I am sometimes actually satisfied with only 3 colors, rather than my typical M.O. of 5 or 6…….

Linking To:


Wednesday, May 14, 2014

Before & After: Chippy Chalk-Painted Aqua Dresser Mirror

I'm sure I'm not the only junker who stockpiles treasures to work my paint magic on at a later date, but I don't normally wait a whole year to do it!


I remember when I saw this mirror at Goodwill.

It had just left the stockroom and was still on the cart, waiting to be put on the shelf.


It was quite easy to imagine how beautiful it would look with layers of chalk paint.


So after procrastinating the design process for a year, this project was one of those delightful surprises when it magically falls into place instantly, and designs itself.

Nope, no real brainstorming this time.......


Just beautiful chalk paint layers of Aqua, Cream, Beige, and metallic warm Gold.


A really awesome bonus to this piece? The original lacquer on the wood base had authentically crackled, so it gave added texture to the chalk paint layers.


It also facilitated my distressing process. Where I normally only use various grits of sandpaper, this time I also used a chisel to scrape off paint. The old lacquer helped the paint come off in a more chippy appearance, which looks totally awesome.


The cardboard backing was in decent shape, with no tears or puncture wounds,
so rather than rip it off and create another tedious step, 
I chose to seal it with wood glue and cover it in chalk paint and wax.


Underneath the base, it still had its original label with handwriting,
so of course I left it that way. I have a soft spot for original labels, 
especially when they're really old like this one, so it's my M.O.
to keep them intact if they're on the bottom not hurting anybody....
It's my way of preserving a little memento of its history.


Oh, I do love it when painting progress comes together easily.

Linking To: 

http://www.savvysouthernstyle.net/2014/05/wow-us-wednesdays-169.html?utm_source=feedburner&utm_medium=feed&utm_campaign=Feed%3A+SavvySouthernStyle+%28Savvy+Southern+Style%29

Friday, May 2, 2014

Aqua & Red, Baby!........Chalk Paint Makeover

Aqua and Red, Baby!


Y’all know how much I adore any shade of Aqua, and paired with Red, it’s perfect!

Before:


After:


This poor little jewelry box had great bones, but really needed cosmetics to accentuate the positive.


It was also musical, but the mechanism was broken. So, like I’ve done in the past, I removed the chime parts, and filled in the holes.


It also had/has a chip on the bottom front corner of the top drawer. Since I planned on distressing this piece, I chose to leave it, rather than repair it, as it would add more authentic charm.


While my typical M.O. is to layer several chalk paint colors, this piece was more about the hand-painted designs and the good bones.


I started with a base coat of warm black, and then Annie Sloan’s Emperor’s Silk Red. After that, I spent hours designing and re-designing the graphics and placement of the Aqua, Red, and Black topcoats.


The gorgeous Aqua is a custom mix that resembles a deep Tiffany blue. Need proof? Here ya go….


After stripping the drawers’ interiors, I lined them with gorgeous and vibrant Italian paper. I was looking for a design with Red and just-the-right Aqua, and found it in a paper that I ended up having to order from an Etsy shop in Germany! How’s that for being ultra-picky! 


The paper’s graphics truly dictated my hand-painted designs, thus making this project especially challenging. I really wanted them to gel with the style of the paper, so my choices had to be somewhat geometric, without looking modern. While it might seem like a no-brainer to design a modern piece that could have more mass appeal and sell easily, I tend to only create for my own taste, and modern is not it. I think it’s safe to say I always gravitate towards Medieval or Old World, which seems to be an obvious indicator I lived there in a past life…..:)


I drew shapes that slightly echoed the shapes in the paper, without looking too matchy-matchy. I even added that shape behind the drawer knobs, as sort of trompe l’oeil rusty escutcheons. It just gave the plain knobs a little more visual interest. I’m a big fan of adding the illusion of objects and architecture using only paint. So cheap, yet so effective!


Okay, so I said my next project was going to be the spice cupboard, but since the Italian paper was waiting for me, I felt obligated to finally use it. Since I’m planning on a really time-consuming design for the cupboard, I may end up working on it simultaneously with a couple other projects, so I don’t feel completely imprisoned. I say this because whenever I’m focused on one painting design, depending on how long it takes, I feel completely liberated when I finally finish it. I think since the sun is finally shining and Spring is in full bloom, the chicken wire creations keep calling me back. We’ll see what I finish first……:)

Come Join Me on Instagram!
@MagiaMiaEtsy


Linking To: